Join the AI Workshop and learn to build real-world apps with AI. A hands-on, practical program to level up your skills.
WebRTC stands for Web Real Time Communication.
It allows you to create direct data connections between browsers.
You can use it to
- stream audio
- stream video
- share files
- video chat
- create a peer-to-peer data sharing service
- create multiplayer games
and more.
It aims to make real-time communication easy to build with web technologies, without third-party plugins. WebRTC is the standard; no plugins are required.
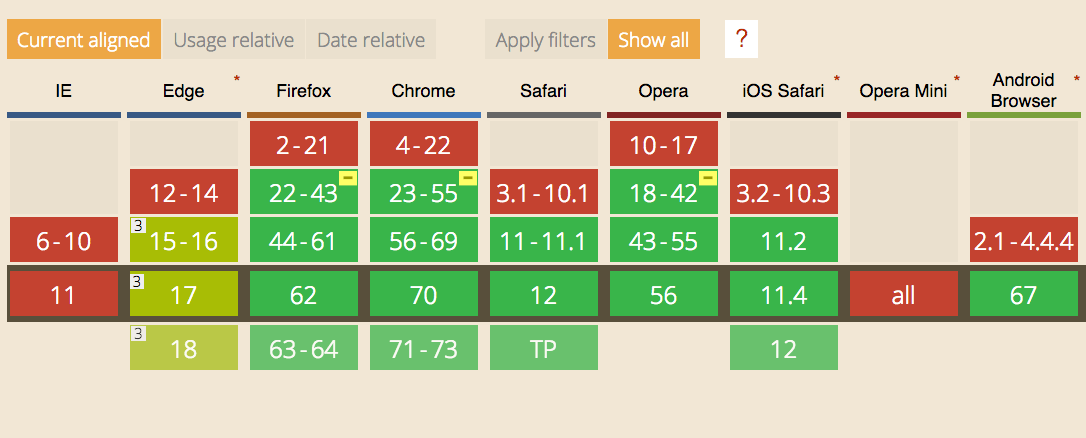
It is supported by all the modern browsers (with partial support from Edge which does not support RTCDataChannel - see later):
WebRTC implements the following APIs:
MediaStreamgets access to data streams from the user’s end, like the camera and the microphoneRTCPeerConnectionhandles communication of audio and video streaming between peersRTCDataChannel: handles communication of other kinds of data (arbitrary data)
With video and audio communication you’ll use MediaStream and RTCPeerConnection.
Other use cases (gaming, file sharing, etc.) rely on RTCDataChannel.
This lesson walks through an example that connects two remote webcams using a WebSocket server with Node.js.
Tip: in your projects you’ll likely use a library that abstracts away many of those details. This tutorial aims to explain the WebRTC technology, so you know what is going on under the hood.
MediaStream
This API lets you access the camera and microphone stream using JavaScript.
Here is a simple example that asks you to access the video camera and plays the video in the page:
See the Pen WebRTC MediaStream simple example by Flavio Copes (@flaviocopes) on CodePen.
Add a button and a video element with autoplay. You can add the WebRTC Adapter for cross-browser compatibility:
<button id="get-access">Get access to camera</button>
<video autoplay></video>
<script src="https://webrtc.github.io/adapter/adapter-latest.js"></script>
On click, call getUserMedia() and set the stream as the video’s srcObject. Use stream.getVideoTracks() to get the camera. See the getUserMedia() lesson. Example:
document
  .querySelector('#get-access')
  .addEventListener('click', async function init(e) {
    try {
      const stream = await navigator.mediaDevices.getUserMedia({
        video: true,
      })
      document.querySelector('video').srcObject = stream
      document.querySelector('#get-access').setAttribute('hidden', true)
      const track = stream.getVideoTracks()[0]
      setTimeout(() => track.stop(), 3 * 1000)
    } catch (error) {
      alert(`${error.name}`)
      console.error(error)
    }
  })
The arguments to getUserMedia() can specify additional requirements for the video stream:
navigator.mediaDevices.getUserMedia(
  {
    video: {
      mandatory: { minAspectRatio: 1.333, maxAspectRatio: 1.334 },
      optional: [{ minFrameRate: 60 }, { maxWidth: 640 }, { maxHeight: 480 }],
    },
  },
  successCallback,
  errorCallback,
)
To get an audio stream, request audio: true as well and use stream.getAudioTracks() instead of stream.getVideoTracks().
After 3 seconds of playback we stop the video streaming by calling track.stop().
Signaling
Signaling is not part of the WebRTC protocol but it’s an essential part for real time communication.
Via signaling, devices communicate between each other and agree on the communication initialization, sharing information such as IP addresses and ports, resolutions and more.
You are free to choose any kind of communication mechanism, including:
We implement it using Websockets.
Install ws using npm:
npm init
npm install ws
We start with a simple Websockets server skeleton:
const WebSocket = require('ws')

const wss = new WebSocket.Server({ port: 8080 })

wss.on('connection', (ws) => {
  console.log('User connected')

  ws.on('message', (message) => {
    console.log(`Received message => ${message}`)
  })

  ws.on('close', () => {
    //handle closing
  })
})
We first add a ‘username’ box to our frontend, so the user can pick a username before connecting to the server.
<div id="login">
  <label for="username">Login</label>
  <input id="username" placeholder="Login" required="" autofocus="" />
  <button id="login">Login</button>
</div>
In the client JavaScript we initialize the Websocket to the server:
const ws = new WebSocket('ws://localhost:8080')

ws.onopen = () => {
  console.log('Connected to the signaling server')
}

ws.onerror = (err) => {
  console.error(err)
}
When the user enters the username and clicks the login button we get the username value and we check it, then we send this information to the server:
document.querySelector('button#login').addEventListener('click', (event) => {
  username = document.querySelector('input#username').value

  if (username.length === 0) {
    alert('Please enter a username 🙂')
    return
  }

  sendMessage({
    type: 'login',
    username: username,
  })
})
sendMessage sends a JSON message to the WebSocket server. Use a type field to distinguish message types:
const sendMessage = (message) => {
  ws.send(JSON.stringify(message))
}
On the server, parse the JSON and switch on the message type:
ws.on('message', (message) => {
  let data = null

  try {
    data = JSON.parse(message)
  } catch (error) {
    console.error('Invalid JSON', error)
    data = {}
  }

  switch (data.type) {
    case 'login':
      console.log('User logged', data.username)
      break
  }
})
Store connected users in an object:
const users = {}If the username is taken, send an error; otherwise store the WebSocket in users:
//...
case 'login':
  console.log('User logged', data.username)
  if (users[data.username]) {
    sendTo(ws, { type: 'login', success: false })
  } else {
    users[data.username] = ws
    ws.username = data.username
    sendTo(ws, { type: 'login', success: true })
  }
  break
On the client, handle the login response:
ws.onmessage = (msg) => {
  console.log('Got message', msg.data)

  const data = JSON.parse(msg.data)

  switch (data.type) {
    case 'login':
      handleLogin(data.success)
      break
  }
}
handleLogin() initializes the RTC connection on success:
const handleLogin = (success) => {
  if (success === false) {
    alert('Login failed, try a different username')
  } else {
    document.querySelector('div#login').style.display = 'none'
    document.querySelector('div#call').style.display = 'block'
    startRealTimeCommunication()
  }
}
Next: how RTCPeerConnection works.
RTCPeerConnection
RTCPeerConnection is at the basis of establishing a WebRTC connection between two peers.
It accepts a configuration object that contains the STUN or TURN (or both) servers info we use.
These are needed to communicate to the user the IP address of its machine, as the client is behind a NAT router. Most users do not connect directly using a modem.
If you’re not familiar with NAT, very quickly: your house has one external IP address given to you by the provider, and your router has an internal IP address (like 192.168.x.x or 10.0.x.x). Every device connected to the router gets an internal IP address too. The router uses NAT to translate external IP addresses to internal IP addresses, and back.
We’ll use the Google STUN servers that are free to use:
const configuration = {
  iceServers: [{ url: 'stun:stun.l.google.com:19302' }],
}
Request camera access with getUserMedia():
const startRealTimeCommunication = () => {
  navigator.getUserMedia(
    { video: true, audio: true },
    (myStream) => {
      stream = myStream
      document.querySelector('video#local').srcObject = stream
      connection = new RTCPeerConnection(configuration)
    },
    (error) => {
      console.error(error)
    },
  )
}
Once we have a stream, we can create an RTCPeerConnection and we also initialize a callback for when a stream is added from the other remote end. We do this in this way to provide compatibility with implementations that don’t use track-based events yet, like Firefox and Safari:
const startRealTimeCommunication = () => {
  navigator.getUserMedia(
    { video: true, audio: true },
    (myStream) => {
      stream = myStream
      document.querySelector('video#local').srcObject = stream
      connection = new RTCPeerConnection(configuration)

      connection.addStream(stream)
      connection.onaddstream = (e) => {
        document.querySelector('video#remote').srcObject = e.stream
      }
    },
    (error) => {
      console.error(error)
    },
  )
}
At this point we have a connection to the server through Websockets, and we are ready to negotiate the WebRTC session with the remote peer.
To call the other peer we need to know their username, so we add a text field and button to start the call:
<div>
  <input id="username-to-call" placeholder="Username to call" />
  <button id="call">Call</button>
  <button id="close-call">Close call</button>
</div>
In the client JavaScript we listen for the click event on this button and we get the username value.
If the username is valid we store it in the otherUsername variable we’ll use later, and we create an offer.
let otherUsername

document.querySelector('button#call').addEventListener('click', () => {
  const callToUsername = document.querySelector('input#username-to-call').value

  if (callToUsername.length === 0) {
    alert('Enter a username 😉')
    return
  }

  otherUsername = callToUsername

  // create an offer
  connection.createOffer(
    (offer) => {
      sendMessage({
        type: 'offer',
        offer: offer,
      })

      connection.setLocalDescription(offer)
    },
    (error) => {
      alert('Error when creating an offer')
      console.error(error)
    },
  )
})
Once we get the offer by calling RTCPeerConnection.createOffer(), we pass it to our server and we call RTCPeerConnection.setLocalDescription() to configure the connection.
On the server side, we process the offer and we send it to the user that we want to connect to, passed as data.otherUsername:
case 'offer':
  console.log('Sending offer to: ', data.otherUsername)
  if (users[data.otherUsername] != null) {
    ws.otherUsername = data.otherUsername
    sendTo(users[data.otherUsername], {
      type: 'offer',
      offer: data.offer,
      username: ws.username
    })
  }
  break
The client receives this offer as a Websocket message, and we call the handleOffer method:
ws.onmessage = (msg) => {
  //...
  switch (data.type) {
    //...
    case 'offer':
      handleOffer(data.offer, data.username)
      break
  }
}
This method accepts the offer and the username, and we first call RTCPeerConnection.setRemoteDescription() to specify the properties of the remote end of the connection, then RTCPeerConnection.createAnswer() to create the answer to the offer.
Once the answer is created, we use it to set the properties of the local end of the connection and we post it to our server, using the sendMessage function.
The RTCSessionDescription object describes the connection capabilities and must be initialized before the RTC can happen. We must set both the description of the local end of the connection (setLocalDescription), and the description of the other end of the connection (setRemoteDescription).
const handleOffer = (offer, username) => {
  otherUsername = username
  connection.setRemoteDescription(new RTCSessionDescription(offer))
  connection.createAnswer(
    (answer) => {
      connection.setLocalDescription(answer)
      sendMessage({
        type: 'answer',
        answer: answer,
      })
    },
    (error) => {
      alert('Error when creating an answer')
      console.error(error)
    },
  )
}
On the server side we handle the answer event:
case 'answer':
  console.log('Sending answer to: ', data.otherUsername)
  if (users[data.otherUsername] != null) {
    ws.otherUsername = data.otherUsername
    sendTo(users[data.otherUsername], {
      type: 'answer',
      answer: data.answer
    })
  }
  break
We check if the username we want to talk with exists, then we set it as the otherUsername of the Websocket connection. We send the answer back to that user.
On the client side that user will get the answer message that triggers the handleAnswer() method, which calls RTCPeerConnection.setRemoteDescription() to synchronize the properties of the remote end of the connection:
ws.onmessage = (msg) => {
  //...
  switch (data.type) {
    //...
    case 'answer':
      handleAnswer(data.answer)
      break
  }
}

const handleAnswer = (answer) => {
  connection.setRemoteDescription(new RTCSessionDescription(answer))
}
Now that the session descriptions have been synchronized, the two peers start to determine how to establish the connection between them, using the ICE protocol. This is the key part that works around the NAT routers limitations.
RTCPeerConnection produces an ICE candidate and calls its onicecandidate callback function. In the callback we send the ICE candidate to the other end of connection, using our sendMessage() function:
connection.onicecandidate = (event) => {
  if (event.candidate) {
    sendMessage({
      type: 'candidate',
      candidate: event.candidate,
    })
  }
}
On the server side we handle the candidate event by sending it to the other peer:
//...
case 'candidate':
  console.log('Sending candidate to:', data.otherUsername)

  if (users[data.otherUsername] != null) {
    sendTo(users[data.otherUsername], {
      type: 'candidate',
      candidate: data.candidate
    })
  }

  break
The other peer receives it on the client:
ws.onmessage = (msg) => {
  //...
  switch (data.type) {
    //...
    case 'candidate':
      handleCandidate(data.candidate)
      break
  }
}

const handleCandidate = (candidate) => {
  connection.addIceCandidate(new RTCIceCandidate(candidate))
}
We call RTCPeerConnection.addIceCandidate() to add the candidate locally.
At this point the ICE exchange steps and session description are complete, negotiation is done and WebRTC can connect the two remote peers, using the connection mechanism that was automatically agreed upon.
We now have 2 computers communicating directly with each other, exchanging their webcam streams!
Closing the connection
The connection can be closed programmatically. We have a button “Close call” that we can click once the connection has been made:
<button id="close-call">Close call</button>document.querySelector('button#close-call').addEventListener('click', () => {
sendMessage({
type: 'close',
})
handleClose()
})
const handleClose = () => {
otherUsername = null
document.querySelector('video#remote').src = null
connection.close()
connection.onicecandidate = null
connection.onaddstream = null
}On the client, clear the remote stream and close the RTCPeerConnection.
We send the close message to the server, which in turn sends it to the remote peer:
case 'close':
  console.log('Disconnecting from', data.otherUsername)
  users[data.otherUsername].otherUsername = null
  if (users[data.otherUsername] != null) {
    sendTo(users[data.otherUsername], { type: 'close' })
  }
  break
The client calls handleClose() when it receives the close message:
ws.onmessage = (msg) => {
  //...
  switch (data.type) {
    //...
    case 'close':
      handleClose()
      break
  }
}
The complete example is available on this Gist:
Lessons in this unit:
| 0: | Introduction |
| 1: | getUserMedia |
| 2: | ▶︎ WebRTC |
| 3: | What to do if WebRTC on iOS shows a black box |